How To Wash Your Bike
Oddly enough, the most important thing to know about washing bicycles is how not to do it. Do not hook up the high-pressure nozzle on your garden hose and blast your bike clean. And absolutely do not visit your local do-it-yourself car wash, plug the machine full of quarters and supersonically blast your pride and joy clean.
While these approaches make short work of cleaning, they have the nasty side effect of obliterating the precious grease that’s lubricating your all-important bearing components, such as the headset, bottom bracket, hubs, cassette and pedals.
And, if you ride your shiny new steed without grease in these parts, you’ll ruin them quickly and incur quite an expense having them repaired or replaced. What’s more, car-wash sprayers are so powerful, they can actually strip decals and paint off certain frames!
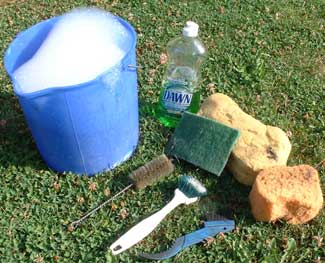
Besides, it’s easy and quick enough to clean a bike with a bucket of soapy water and sponges and brushes (photo). Plus, you won’t have to break into your piggy bank. In fact, some folks set up bike-cleaning stations at home so that after muddy rides they can get their machines spic and span before storing them.
Keep It Clean
In case you need extra motivation to give your bike the scrub-a-dub, bear in mind that clean bikes are easier to work on and spot problems on. On a filthy machine, you have to wipe away grime and you might not notice a glitch that could cause problems on your next ride. Plus, if your bike’s a mess, simple on-the-ride maintenance, such as fixing a flat becomes a miserable job and should you have to carry your bike in a car, it’ll trash the upholstery.
But, perhaps the best reason to keep a bike clean is because it’s easy and also because, as long as you wipe it down once in a while, it’ll stay clean. For this article we’re going to give you the benefit of the doubt and assume that you’ve taken care of your bike and want to know what’s involved in keeping it clean so it never gets too dirty.
All that’s required is a bucket, warm water (cold water works, but it doesn’t make as much suds), dishwashing detergent (use a type that cuts grease), 2 sponges and a few brushes. If your drivetrain’s clean, you can get away with 1 sponge. The other one comes in handy when you need to clean a grimy chain and crankset (you save the clean sponge for the rest of the bike). Ideally, though, you’ll maintain this important part of your bike and never need to spend too much time on it when washing your bike, which is mainly done to remove dirt.
Depending on what type of bike you’re cleaning, you can experiment with brushes that you have around the house to determine which ones work best for cleaning the nooks and crannies on your bike, such as around the front derailleur, crankset and hubs. The green scrubber in the top photo works great for cleaning salt marks from sweat and fingerprints off of titanium frames with brushed finishes.
Set-up
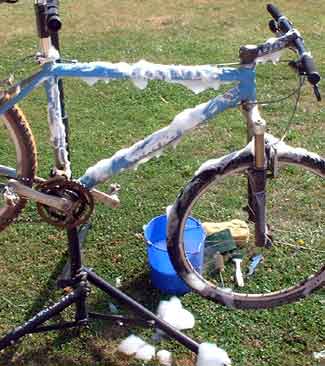
While you can certainly clean a bike with it leaning against a wall, it’s a lot easier on the lower back if you suspend it so there’s no need to lean over. If you don’t have a repair stand (photo), you could hook the tip of your bike seat over a branch, use your hitch-mount car rack to support the bike or suspend your rig from bungee cords attached to an overhang. Just don’t flip the bike upside down or lay it on its side to work on it because this increases the chance that water will reach bearings you want to keep dry.
You needn’t remove the wheels, however, it’s a good idea to remove your accessories, such as the pump, seat bag and computer. Just don’t forget to reinstall them when you’re done cleaning.
Fill your bucket with warm water and enough detergent to make a good bunch of suds, which make cleaning easier.
Bike Bath
Begin washing getting the bike wet by dribbling water from above with a hose or by dipping the sponge and squeezing it over the bike to wet it entirely. Or, you could pour warm soapy water from the bucket. The idea is to wet the entire bike to loosen any dirt, mud or grime before you touch the bike with your sponge. That way, you won’t scratch the paint, which is what would happen if you just started rubbing.
Let the water set a bit and then dip the sponge so it’s loaded with suds and start cleaning the bike.  It’s good to work from the front to the back or from the top to the bottom to keep track of what you’ve done in case you get interrupted. Remember to only use the second sponge on the drivetrain parts. Otherwise, the grime will spread to the frame, handlebar tape, tires, etc. making a mess.
The brushes come in handy for behind the crankset; around the brakes; under the fork; around the hubs; etc. If there’s some build up of dirt or grime in the drivetrain, such as between the chainring or cogs or on the derailleur pulleys, use a thin screwdriver to scrape it out and then clean it again with the right sponge.
If you have standard brakes (not discs) be sure to scrub the rims, especially the sidewalls because they’re your braking surfaces. Keeping the rims clean ensures positive braking. Rubber deposits that won’t come off with the soapy water can be removed with rubbing alcohol or lighter fluid. This trick will also work for stickies you might find on your bike, too, such as tar.
It’s a good idea to inspect as you clean your bike. For example, while cleaning the tires you can look for sidewall cuts or tread wear, signs that it’s time for a new tire. When working around the brakes and derailleurs, check the cables to see if they’re fraying or rusting. And look at the cable housing for cracking, a sign that it should be checked and possibly replaced.
Once you’ve washed all the dirt off your bike, finish the job by rinsing and drying. Dribble water from above to remove any remaining suds and soapy water. Or, fill the bucket with clean water and pour it over the top of the bike. Then dry the bike (use a soft towel or chamois) and apply a spritz of lube to the chain, derailleur and brake pivots and you’re ready to roll.
